Installing your SIM365 on iPhone: Easy Setup & Tips
Installing an eSIM on your iPhone is a straightforward process, but it can vary slightly depending on your iOS version.
Here are four easy ways to set up a SIM365 on your iPhone
- Using a QR Code Provided by Your Carrier
- Get the QR Code: Purchase your eSIM365 package to start your activation.
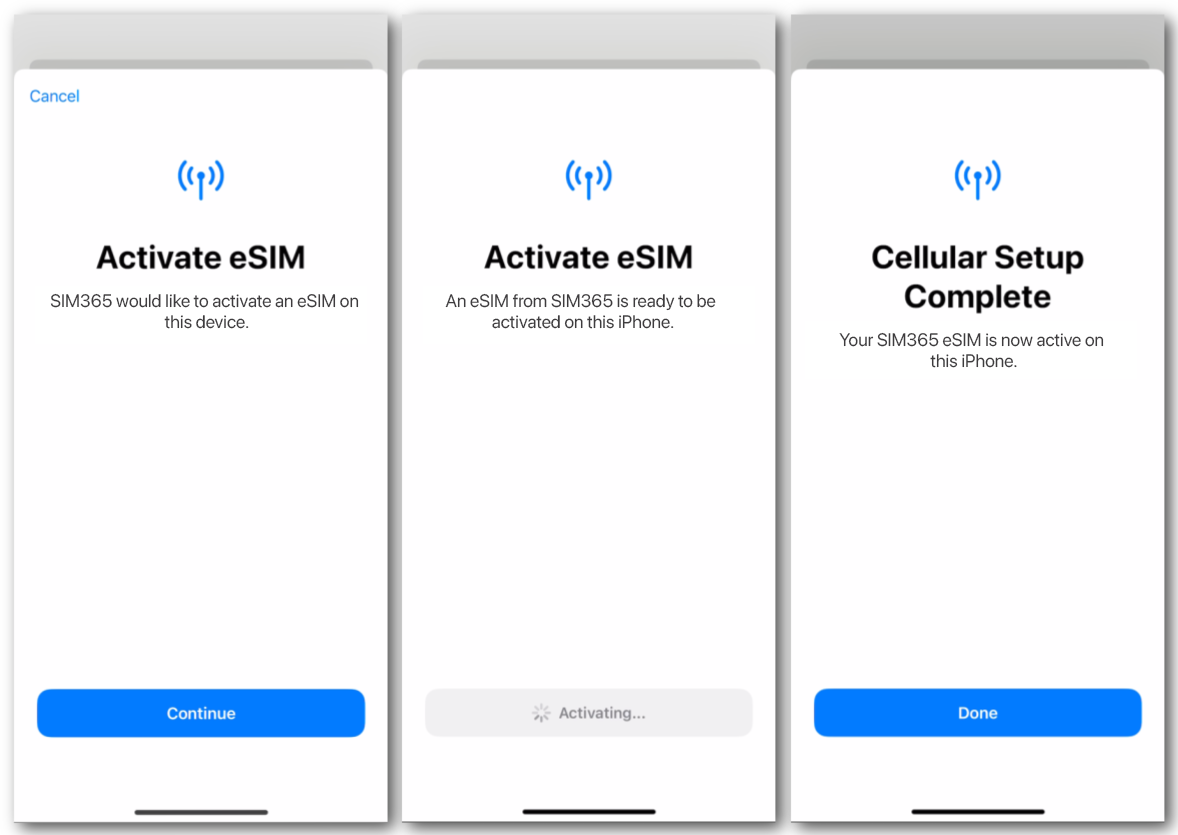
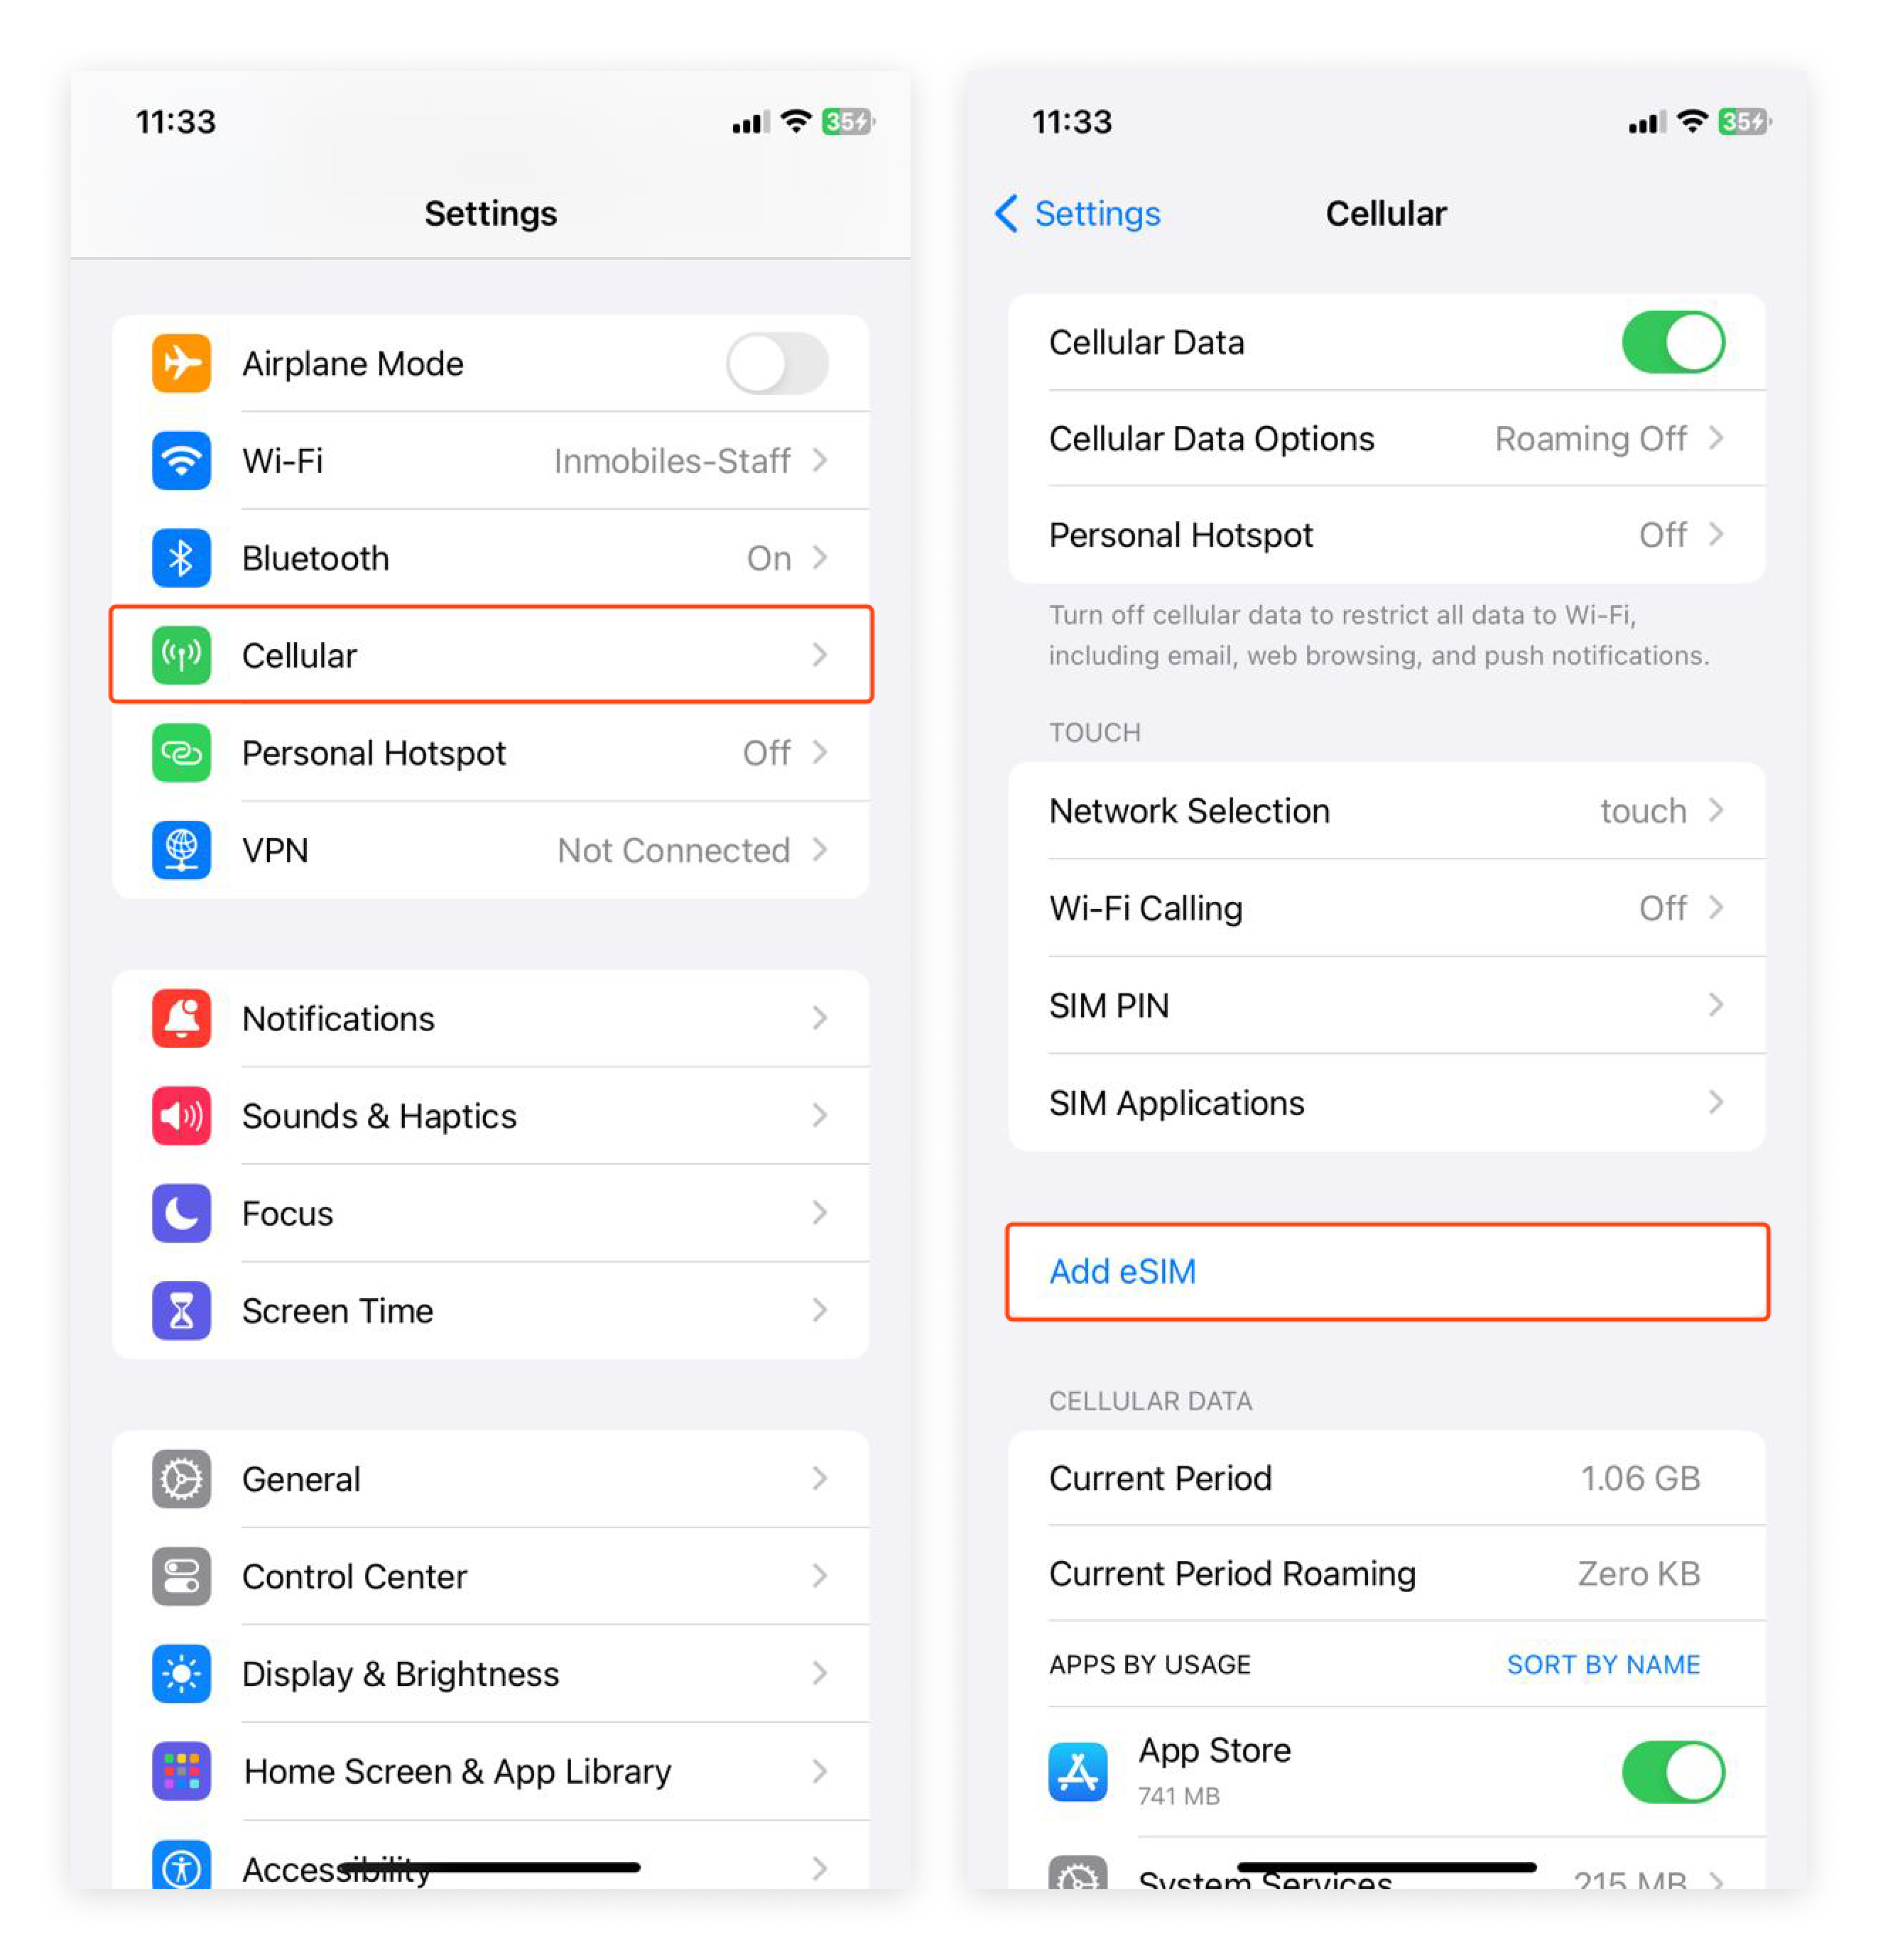
- Open Settings: Go to Settings > Cellular > Add Cellular Plan.
-
Scan the QR Code:
- Your iPhone will prompt you to use the camera to scan the QR code.
- Align the QR code within the frame on your iPhone screen.
- Enter Confirmation Code (if required)
- Label Your Plans: You may have the option to label your plans (e.g., Primary, Secondary, Work). This is helpful for managing multiple plans.
- Activate the Plan: Follow any additional instructions from your carrier to complete activation.
2. Using SIM365 App
- Download the SIM365 App: SIM365 offers a comprehensive app for managing your account and activating eSIMs. Download the app from the App Store if you haven’t already.
- Open the App and Log In: Sign in to your account or follow the in-app instructions for activating a new eSIM.
- Follow Activation Steps:The app will guide you through the steps to activate your eSIM. This typically involves scanning a QR code or entering details manually.
- Complete Setup: Once the app confirms activation, go to Settings > Cellular to ensure the plan is listed and active.
3. Manual Setup Using Carrier Details
- Open Settings: Go to Settings > Cellular > Add Cellular Plan.
- Enter Details Manually: If you don't have a QR code, select Enter Details Manually. You will need to input information provided by your carrier, such as the SM-DP+ address and activation code.
- Follow On-Screen Instructions: Enter the details and follow the prompts to complete the setup.
- Verify and Label: Once added, label your plan as needed and verify that the plan is active.
4. Using eSIM Quick Transfer
Quick Transfer is a convenient feature for users upgrading their iPhones. This method is particularly useful for transferring an eSIM from an old iPhone to a new one. It simplifies the process of eSIM activation and ensures that your new device is ready to use with minimal hassle.
- Check eSIM Compatibility: Ensure your old and new iPhones are compatible with eSIM technology. This feature is available in iPhone models starting from the iPhone XS.
- Prepare Both iPhones: Have your old iPhone with the active eSIM and your new iPhone ready. Ensure both devices are updated to the latest iOS version for a smooth eSIM transfer.
- Initiate eSIM Transfer: On your new iPhone, go to Settings and select ' Cellular '. Then choose ' Add Cellular Plan '. The phone will guide you through the eSIM Quick Transfer process.
- Confirm Transfer on Old iPhone: A prompt will appear on your old iPhone asking if you want to transfer the eSIM to your new device. Confirm this to proceed with the eSIM activation on your new iPhone.
- Complete Setup on New iPhone: Follow the on-screen instructions on your new iPhone to complete the eSIM setup. This may involve choosing preferences for your eSIM data plans, such as selecting a default line for calls, messages, and data usage.
- Verify eSIM Activation: Once the transfer is complete, check the cellular settings on your new iPhone to ensure the eSIM is active and functioning correctly. This step confirms the successful eSIM configuration and activation.
If the automatic transfer fails, you may need to use manual eSIM activation. This can involve entering details provided by your carrier or scanning a QR code for eSIM.
By following these methods, you should be able to easily set up your SIM365 on an iPhone. If you encounter any issues, your carrier’s customer support can provide additional assistance.
- Update iOS: Make sure your iPhone is running the latest version of iOS for the best compatibility and features.
- Check Carrier Support: Not all carriers support eSIMs. Confirm with your carrier that eSIM is available for your plan and region.
- Reboot Your iPhone: If you experience issues with activation, try restarting your iPhone to refresh the network settings.
Activating Your sim365 Line
After installing your eSIM, the next crucial step is activating it when you reach your destination. Activating your eSIM line is as simple as flipping a switch. Once you do this, your iPhone is ready to connect to a mobile network using the eSIM.
- Prepare for Activation
- Check Compatibility: Ensure your iPhone model supports eSIM and is running the latest version of iOS. iPhones from the iPhone XS and later support eSIM.
- Obtain eSIM Details: You’ll need information from your carrier, such as a QR code, an activation code, or details provided via an app.
- Turn On Your SIM365 Line
- Open the Settings app on your iPhone.
- Select Cellular or Mobile, depending on your iOS version.
- Find the eSIM line you installed (it will be labeled, e.g., 'Italy eSIM').
- Toggle the switch next to Turn ON This Line to the ON position.
- Enable Data Roaming
To use data services in your travel destination, you need to enable data roaming. This allows your iPhone to access the internet over a cellular network when you are outside your home country.
- Stay in the Cellular or Mobile settings.
- Scroll to find Data Roaming.
- Toggle the switch next to Data Roaming to ON.
It's important to note that roaming charges may apply, depending on your eSIM plan and the carrier's policies. Always check the roaming rates with your eSIM provider to avoid unexpected charges.
- Connect to a Network
Usually, your iPhone will automatically find and connect to a local network after you enable the eSIM line and data roaming. However, if it doesn't connect automatically:
- Go back to the main Settings menu.
- Tap Carrier or Network Selection.
- Turn off Automatic selection.
- Wait for a list of available networks to appear.
- Select the network that corresponds with your eSIM provider or the strongest local network.
By following these steps, your iPhone will connect to the network, and you can start using your mobile data and services immediately. Remember, if you face any connectivity issues, restarting your iPhone can often resolve these minor glitches. Or you can contact our Customer support at any time.
